Having a title such as John it’s no surprise I’ve set up a slew of bathrooms to date. It is not glamorous work, but somebody’s gotta get it done. Obviously, our disclaimer would be that every toilet is different and may call for a somewhat varied installation technique so make sure you read all the instructions that correlate to your throne prior to proceeding. Here’s the potty play by play.
Step One: Measure Bathroom Rough In Dimensions
Before hitting Lowe’s or Home Depot to your new bathroom, measure the distance in the rear bolts (at the bottom of the toilet nearest into the wall) and the wall behind your toilet. This can be known as the bathroom’s rough-in and many toilets are designed using a 12″ rough-in. One of our bathrooms was really a streamlined version so make sure not to skip this measure of you will get a toilet that won’t line up with your existing plumbing.
Step Two: Stop The Water Source From Existing Bathroom Toilet
Once you’re home with the suitably sized replacement bathroom it is time to eliminate the existing one. The very first step is to turn off the toilet’s water source (usually located behind the bottom left-hand corner of the bowl). Eliminate the little quantity of lingering water from the tank and tank with a sponge or a few rags to ensure that they’re both completely empty.
Step Three: Remove The Existing Bathroom Toilet Tank
Use a wrench to remove the coupling nut involving the present toilet tank and its water source. You may need to hold the valve with pliers from inside the tank to keep it from twisting. Next, eliminate the toilet bowl that’s typically fastened to the ground with two bolts (although some have four). If these bolts provide you any trouble you can always carefully eliminate’em with a mini-hacksaw.
Then simply loosen the bowl by rocking it to break the seal with the ground and carry it straight out (our previous pea green one lived in the backyard till we can take it to Habitat For Humanity’s ReStore a few days later). It helps to have somebody on hand to instantly stuff rags to the recently exposed toilet flange (the gap in the ground which may smell pretty horrible if left unplugged).
Step Four: Remove Old Wax and Flange
To prepare for the new toilet, thoroughly remove any old wax from the ground and the flange with a screwdriver or a putty knife. Then unscrew the old bolts that hold the toilet down and throw them away (it is a hard and fast rule to never attempt to reuse them). Oh and now’s a fantastic time to clean and paint the wall behind the toilet while you have full access.
Step Five: Temporary Setup of New Toilet
Temporarily set the toilet set up on the ground within the flange to make certain it matches and check that it looks flat. View it in all possible angles and, if needed, utilize plastic shims to get things level. Then it is time to put in the new bolts to hold the toilet bowl to the floor. If there are openings to the bolts in the toilet flange, just slide them right through.
In case you’ve got a cast iron piping system, these screws can be drilled right into the wood floor, but be sure to set up the bolts so that they’re the exact same distance from the rear wall behind the toilet.
Step Six: Installing The New Toilet
Installing your new toilet pretty much goes backwards from the measures above which detailed removing the older one. Be super careful with your bowl and bowl because they can chip and crack super easily (especially in the event that you get overzealous when you’re tighten bolts).
You should have purchased a wax ring kit along with your new toilet, and you are going to want to follow along with the instructions that come with that to the letter (this is vital to prevent leakage that can rot your floor and essentially destroy your own life ).
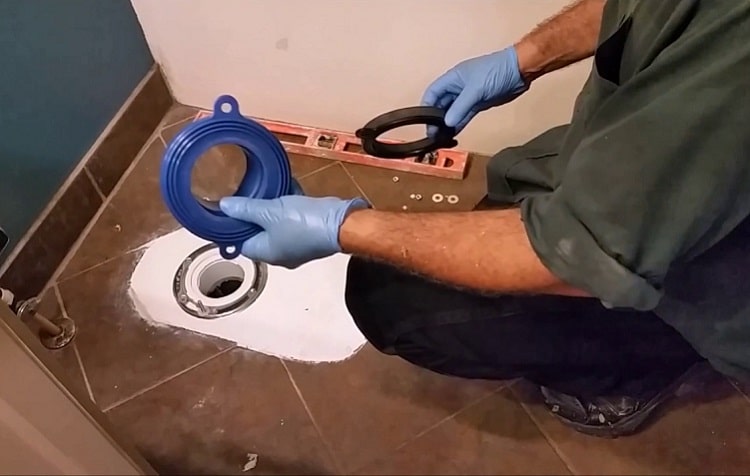
Step Seven: Setting Up The Wax Ring
Now it’s time to remove the rag from the gap in the ground (hold your nose for this measure ) and carefully place the wax ring round the socket in the bottom of the bathroom (using the wax-side on the bathroom). Press it slightly to make sure it retains, since you’ll be turning it upside down next. One that you’ve carefully flipped it line up the bathroom over the opening of the floor (the flange) as well as the bolts.
The bolts that hold the toilet down should pass through their openings at the bowl base, and wax ring ought to make contact within the flange. To set the bowl onto the ground, rock it from front to rear and side to side while pushing down firmly.
Don’t lift the bowl in the ground when making alterations or you will literally need to replace the wax ring all over again since the toilet will flow to no end each time it’s used. It has occurred to us.
Step Eight: Tighten The Bolts
Drop washers across the bolts which hold the toilet to the ground and tighten the nuts with your palms (why you should only finger-tighten the bolts is due to the fact that over tightening with a wrench can crack the bathroom which can be seriously bad news).
Step Nine: Toilet Tank Hardware Installation
If the toilet tank hardware comes individually, install it using the accompanying directions. Pick up the tank and lower it gently into position on the rear of the bowl. Then set up both long tank-mounting bolts from inside the tank, then slipping down them through the holes and tighten the nuts and washers gently and evenly until they are snug. Viola- it is beginning to resemble a real bathroom.
Step Ten: Connecting New Toilet To Water Supply
Now it is time to connect the tank’s water supply to the inlet valve at the bottom left of this tank. You’ll probably have a coupling nut laying around just for this use. Then turn the water on and watch the toilet tank since it matches up. Whether there are any leaks, then gently tightening the bolts must fix’em in a flash (initial leaks are actually pretty common, but locating the leakage and tightening the bolt ever so slightly is usually all it takes).
At this point, you must also be certain that the tank is filling up to the correct level (about 3/4″ under the very top of the flow tube). Then just tighten the bolts that secure the bowl into the ground one turn beyond hand-tight (with a wrench, but only one turn- that I mean it!).
Materials Needed For Installing New Toilet As DIY Project
- Standard Quality Toilet
- Sponge or Rags for removing excess water
- Gloves
- Towels
- Screwdriver
- Wax toilet seal
- Socket Wrench
- Mini Hacksaw (for removing bolts)
Summing It Up
Removing and installing a new toilet is an easy DIY project that any homeowner can do in 1-2 hours, depending on the weight of the toilet you may end up needing one more hand. Hope you have gone through the article and learn how to make your toilet installation go smoothly. A big thanks to all the visitors who found this tutorial easy and knowledgeable.
More For You:
6 Places to Find and Buy Reclaimed Wood for Your Next DIY Project