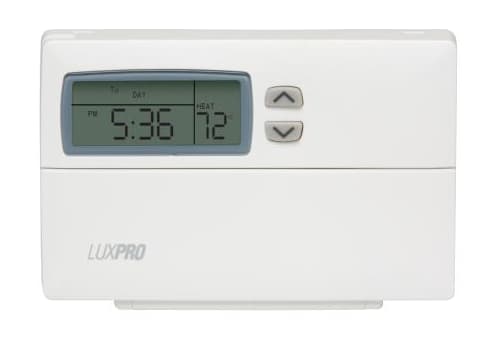
Experiencing issues with your system? The “Luxpro Thermostat Not Working” problem is a common one, but there are several troubleshooting steps you can take to address it. Ensure you’ve checked the basics, like power and settings, before diving deeper into potential causes.
A thermostat is more than just a gadget on your wall; it’s the cornerstone of a comfortable home. Imagine battling scorching summers and chilly winters without a reliable thermostat! Luxpro, with its vast array of models, promises to offer this comfort.
But what happens when your trusted device falters? Let’s delve into some common Luxpro thermostat issues and how you can address them without calling an expert.
Luxpro Thermostat Not Working – How to Fix At Home

Understanding Your Luxpro Thermostat
Luxpro isn’t just a name plucked from the ether. It’s a brand that’s been around, ensuring homes stay comfortable year-round. Their range of models cater to varied household needs, each boasting its unique features.
Getting acquainted with your model can significantly simplify the troubleshooting process. So, before you jump into fixes, take a moment to understand your thermostat.
Common Signs Your Thermostat Isn’t Working Properly
Thermostats, being central to a home’s climate control, exhibit certain symptoms when they malfunction. Here are a few tell-tale signs:
- Temperature Discrepancies: You set the thermostat to a specific temperature, but the room doesn’t feel right. The ambient temperature and the thermostat’s reading don’t match.
- Non-responsive Interface: The display screen may go blank or not change when you attempt to adjust settings.
- HVAC Misbehavior: The heating, ventilation, or air conditioning systems may not switch on/off in accordance with the thermostat’s settings.
- Unusual Noises: Some thermostats might produce clicking sounds or other noises when switching systems on or off. If this sound becomes constant or irregular, it’s a warning sign.
How to Fix Luxpro Thermostat Not Working at Home?
-
Check the Luxpro Batteries
Initiate the troubleshooting process by meticulously inspecting the batteries of your Luxpro thermostat. A depleted battery could be the culprit behind the system’s erratic temperature deviations.
Should you observe your thermostat regulating temperatures far above or below your preset, the onus likely falls on drained batteries.
Reference the drained cells, and procure fresh, compatible replacements. Ensure these are installed with precision, aligning them accurately. Implementing this solution should seamlessly rectify your thermostat’s irregularities.
-
Check the Circuit Breaker
Begin by ensuring your thermostat is indeed powered.
Occasionally, circuit breakers succumb to short circuits, ground faults, or other intricate electrical disruptions.
Should you observe a recurrent tripping pattern in your circuit breaker, it’s paramount. Don’t dally; seek the expertise of a seasoned professional.
-
Clean the Brass Contacts
Ascertain the contacts positioned on the subbase. Notably, a pair of brass prongs will manifest above the inscriptions on the wire terminals.
Confronted with heating or cooling anomalies? Delicately compress these contacts, ensuring no harm befalls them.
For the solitary contact pens on the circuit board, enlist the humble pencil eraser for a gentle cleanse. This maneuver ought to resolve the predicament at hand.
-
Adjust the Dip Switches on your Heat Pump
Discover the dip switches on the thermostat’s posterior side. It’s imperative that Switch1 aligns to the ‘On’ stance, and concurrently, the fan toggle rests in the ‘Electric’ slot.
Post adjustments, a thermostat reboot becomes essential to operationalize these modifications.
-
Check the Wiring
Faulty wiring can stem from myriad underlying causes. Firstly, ensuring connectors securely anchor to their respective terminals is paramount.
Furthermore, antiquated wiring could compromise your thermostat’s functionality.
Conclusively, tethering a millivolt thermostat to line voltage is a strict no-go. Tackling compromised wiring independently? Not a judicious choice. Rather, summon a qualified electrician to meticulously assess the wiring scenario.
-
Display is locked
Spot the locked symbol on the display. Give that icon a nudge, revealing the “Unlock Keyboard” prompt.
Hit ‘Ok’, then employ the ascending and descending arrows to input your designated lock code. Once satisfied, tap ‘Ok’ to finalize.
Did you forget that elusive lock code? No cause for alarm. Simply reset the thermostat. Upon its revival, your Luxpro thermostat shall stand unshackled.
Basic Troubleshooting Tips Every Homeowner Should Know
Before diving into intricate solutions, certain basic checks can save both time and money:
- Reset: A fundamental step – turn the thermostat off and then on again, or press the reset button if it has one.
- Power Source: If it’s battery-operated, replace the batteries. If hardwired, ensure it’s receiving power.
- Cleanliness: Dust or debris can interfere with the thermostat’s operations. Gently clean its interior using a soft brush.
Potential Software Issues and Their Fixes
Modern thermostats are mini-computers. With the advancement of tech, here are potential software issues:
- Outdated Software: Over time, manufacturers release updates. Ensure your thermostat’s software is current.
- Glitches and Freezing: If the thermostat freezes or behaves erratically, a software reset or update might be in order.
- Factory Reset: As a last resort, revert the thermostat to its factory settings, though this means you’ll have to reconfigure your settings.
The Role of Your Home’s HVAC System
The thermostat and HVAC systems are closely intertwined. If one malfunctions, the other might seem problematic when it’s not:
- System Checks: Before blaming the thermostat, check if the HVAC system is functioning. Filters might need cleaning, or vents might be blocked.
- Compatibility: Ensure that the thermostat is compatible with the HVAC model. Mixing old systems with new thermostats (or vice versa) can lead to inefficiencies.
Dealing with Advanced Hardware Failures
Like all electronics, thermostats can face hardware wear and tear:
- Internal Damage Signs: Burn marks, corroded batteries, or damaged wires indicate deeper issues.
- Component Failures: Internal components like capacitors or relays can wear out. Replacements might be necessary.
- Age of the Device: Old thermostats are more prone to hardware failures. It might be time for an upgrade.
The Importance of Proper Wiring
Wiring can be tricky. However, ensuring correct wiring connections is essential for the thermostat to function. If you’re feeling brave, open up the thermostat (safely!) and check the connections. But always remember to turn off the power before fiddling with wires.
Temperature Calibration: Ensuring Accuracy
Your Luxpro might sometimes need a nudge to display accurate readings. Calibration ensures your thermostat’s readings align with the actual room temperature. To recalibrate, refer to your device’s manual, and follow the steps carefully.
Addressing Connectivity Issues
Smart thermostats rely on connectivity, and issues here can be frustrating:
- Wi-Fi Connection: Ensure the thermostat is within range of the router. Check if other devices connect to the Wi-Fi to rule out broader network issues.
- Software and Firmware: Sometimes, connectivity bugs are resolved in software updates from the manufacturer.
- Reconnection: Occasionally, disconnecting and reconnecting to the network can solve minor glitches.
The Impact of External Factors on Performance
Believe it or not, the room’s location and even sunlight can impact how your thermostat performs. Ensure your thermostat is away from direct sunlight and drafty windows. A centrally located thermostat often provides the most accurate readings.
The Benefits of Regular Maintenance
Prevention is better than cure:
- Longevity: Regular check-ups ensure a longer lifespan for the thermostat.
- Cost-Efficiency: Spotting and resolving minor issues can save significant repair or replacement costs in the future.
- Optimal Performance: Routine maintenance ensures the thermostat functions efficiently, ensuring a comfortable home environment.
In essence, understanding and tending to your thermostat ensures a seamless experience, and these insights act as a roadmap to a cozy, well-regulated home.
Considering a Replacement? Factors to Ponder
If you’ve had your Luxpro for years, it might be nearing its end. Consider the age, and weigh the costs of repair against a fresh replacement. Sometimes, an upgrade is more economical in the long run.
Contact Customer Care
Should the aforementioned strategies fall short, seeking professional expertise is paramount.
The silver lining? Luxpro’s Support is merely a beckon away, committing to swift resolutions within a 24-hour window.
Additional Resources
If you’re still feeling lost, don’t worry. There’s a world of resources out there, from HVAC professionals to online tutorials.
Frequently Asked Questions
- How do I turn on my Lux thermostat?
Just move the button on the right from ‘Off’ to ‘Heat’ or ‘Cool’.
- Where is the reset button on the Luxpro thermostat?
It’s on the right side and says H.W. Reset. Push and hold it for 5 seconds.
- How do you bypass a luxpro thermostat?
Click the ‘Hold’ button to unlock it. Then, use the up and down buttons to adjust the temperature. You’ll see “Override” on the screen.
You May Also Enjoy Reading:
Final Thoughts
A comprehensive guide to ensure your Luxpro Thermostat runs smoothly, ensuring a cozy ambiance for your home. If this guide steered you through the stormy seas of thermostat troubles and brought you to the serene shores of perfect room temperature, don’t keep it to yourself! Sharing is caring, after all.
Do your friends and family a favor by passing on this handy guide. Knowledge shared is doubled, and comfort should be universal. And remember, the conversation doesn’t end here.
Your experiences, queries, or even feedback are vital to us and fellow readers. So, drop a comment below. We’re all ears, and together, we can make every home a haven of comfort!


